Key Takeaways
- Enable color-coded text outputs for a more intuitive view of file structures, which are easier to parse at a glance compared to the default black and white.
- Brighten up your Terminal with Neofetch, to add colorful art and system info.
- Automatically run the “neofetch” command so that each time you open a new Terminal window you get a pop of color and some useful information.
The Mac Terminal is, simply put, boring. By default, all text input and output appears in a black-and-white color scheme. However, with a few tweaks, the Terminal can be transformed to utilize color, adding both flair and function to the user interface.
Enable Color-Coded Text Outputs
Anyone who has used a terminal emulator on Linux has likely appreciated the color-coded directories and files, which provide visual cues about file types and permissions. This was a feature I very sorely missed when using the default configuration of Terminal on a Mac.

Fortunately, reintroducing color coding to your Mac’s Terminal is a straightforward, copy and paste process. This minor adjustment can significantly enhance the usability of the Terminal by making file structures more intuitive at a glance.

To achieve this, launch Terminal and execute the following command to open your shell settings file:
nano ~/.zshrc
Then, making sure you are on a new line, add the following code at the bottom of the file:
PS1="%{%F{033}%}%n%{%f%}@%{%F{green}%}%m:%{%F{yellow}%}%~%{$%f%}% "
export CLICOLOR=1
export LSCOLORS=ExFxBxDxCxegedabagacad
Save the file with Control+O, then exit with Control+X. Finally, issue this last command to re-initiate Terminal using the .zshrc file we just updated.
source ~/.zshrc
Upon execution, the effects of our modifications should be immediately evident in the new coloration of various aspects of your Terminal shell’s text!
Brighten Things Up With Neofetch
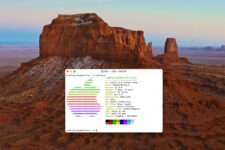
Neofetch adds an instant pop of color to your Mac command line interface (CLI for short). When you run it, the resulting output displays colorful text-based art as well as various bits of system information.

I have my Mac configured so that Neofetch shows its output every time I start Terminal or open a new window. My Mac also shows the Neofetch output every time I clear the Terminal. On top of simply looking pretty, this is extremely useful in visually differentiating workspaces if you use SSH to control machines other than your local Mac.
More on those custom configs later, but first thing’s first: installing Neofetch on your Mac.
Installing Neofetch
We are going to use Homebrew for the installation. Homebrew is a package manager for macOS. It’s possible that you’ve already set up and used Homebrew in the past, in which case you can skip to the next section. For first-timers, fret not! Installing Homebrew is just about as easy as it gets.
All you need to do is open Terminal.app, paste in the command below, and execute it. Input your password when prompted, or use TouchID for sudo authentication.
/bin/bash -c "$(curl -fsSL https://raw.githubusercontent.com/Homebrew/install/HEAD/install.sh)"

Once you’ve authenticated, you’ll be greeted with the screen shown in the above screenshot. Simply press Enter and sit back while Homebrew does its thing and installs onto your machine and returns you to the normal Terminal input prompt.

Now that you’ve got Homebrew installed, installing Neofetch is even easier. Just issue the following command in Terminal
brew install neofetch
Your Terminal window will scroll through lines of output as Neofetch is installed. Once this is complete, test your handiwork by issuing the following command, which will instantly output your beautiful ASCII art and basic system information
neofetch
I previously mentioned how my Mac is configured to show Neofetch whenever I launch Terminal or open a fresh tab/window. Luckily that’s also a snap to configure! Simply open Terminal > Settings and navigate to the Profiles tab along the top, then to the submenu called “Shell.”

Tick the Run Command box and type “neofetch” in the text field directly to its right. Make sure you also tick the Run Inside shell option and that’s it. From now on every Terminal window or tab will be accompanied by a pop of color that I have personally come to regard as an indispensable means of keeping my workspace organized.
By incorporating colors into your macOS Terminal, you not only enhance its appearance but also its usability. These mods make your command line interface both more functional and enjoyable to use. Your CLI is now better in step with Apple’s core design philosophy, which proposes that the most productive workflow cannot rely on rigid functionality alone. Your environment should also be one that you find visually pleasing and comfortable to work in.


