
Address newsletter
Get the latest news on buying, selling, renting, home design, and more.

The thrum of crickets, cooler air, the aroma of fallen leaves, and a touch of color in the trees usher in the onset of autumn in New England. This week in the garden, I am turning my attention to dividing perennials for health, vigor, and, of course, more plants! Dividing perennials helps with overcrowding and improves airflow, lessening the chance of diseases like powdery mildew. Gentle root disturbance often invigorates the plant for more robust growth the following year and encourages better flowering. You can spread divisions to new locations in the garden or share them with friends and neighbors.
Not all perennials are good candidates for dividing, however. Those with prominent taproots like Baptisia’s, Asclepias sp. (milkweeds), lupines, and carrot family members detest being disturbed once settled. Those plants with more fibrous root systems or with underground stems, called rhizomes, are excellent choices for fall division. Hardy perennials such as coreopsis, coneflowers, irises, peonies, and garden phlox all can benefit from division every three to four years, depending on the size of the clump.
To get started, you will need a touch of planning. Be sure to have locations for your divisions prepared ahead of time, whether this means editing your garden or having pots ready to share your divisions: The goal is to minimize the amount of time the plants are out of the ground. The next step is to have a sharp, clean spade or digging fork on hand to dig as deeply and generously around the clump as possible, gently prying the entire plant out of the ground. Some perennials lend themselves to being divided by hand, so don’t be afraid to pull hard or break a few roots. Others will need the edge of the spade and a solid stomp to break them apart. Being mindful of the stems will help the plant and ensure the divisions look good going back into the ground, Simply replant them or pot them up, and follow with a deep soaking.
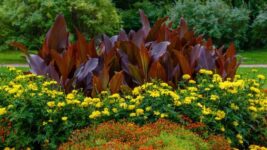
Q. I bought two red-leaf Tropicanna and four red-leaf canna. The plants are thriving. I planted the Tropicanna in 18-inch planters. The canna went in a walkway border garden. After the flower blooms fall away, should I cut off the remaining stem with the seed pods? If so, how much should I cut back? Also, the Tropicanna grew from two stalks to 15 to 20 in the planter. When and how should I break up the bulbs and replant? I was planning on pulling them out of the planter, letting them dry, separating them, and planting them in the spring. Is that right?
B.G., Holden
A. Cannas add dramatic foliage, color, and flare to summer gardens and containers. The beautiful foliage and flowers of cannas arise from thick, fleshy rhizomes. (Dahlias, a popular flowering plant that is divided the same way, have tubers that resemble small sweet potatoes.) Begin by cutting back all the foliage to a few inches above the soil. Once the canna clump is lifted, break apart the rhizomes by hand. Inspect the rhizomes during this process and remove any that appear soft or diseased. Shake off but avoid washing off the soil, as the moisture will invite rot while the plant is dormant. (Dahlia tubers must be cured in low-humidity air for a week to initiate dormancy before being packed for overwintering.) Store in a container, box, or crate with dry leaves, wood chips, wood shavings, or perlite. The rhizomes should be overwintered in a dark, cool place like an unheated garage where the winter temperatures won’t go below freezing. The trick is to provide conditions that are dry but not too dry. Once spring arrives, inspect the rhizomes and tubers again, discarding any that are soft, and prepare to replant after the threat of the late frost has passed.
Q. What would be the best fall dates/temperature to sow seeds directly in Topsfield?
S. D.
A. Few gardeners have access to a greenhouse, so fall seed-sowing is a great way to take advantage of winter’s natural period of dormancy without much effort. Winter sowing is an easy, cost-effective way to produce a lot of seedlings, especially with native plants like wild columbine, asters, goldenrods, and mountain mints that have already adapted to our climate. Like dividing plants, producing seedlings is a beautiful way to share your bounty with those you love. You can start by saving seeds from your garden, trading them with your neighbor, or purchasing packets. Prepare pots or trays with moistened germination mix (a specially designed soil media that retains moisture but is also well drained) and sow seeds evenly across the surface. Cover each pot with a thin layer of sand, about as deep as the seeds are thick, and place it outside in a shaded, protected space. Cover the pots with hardware cloth or wire mesh, as rodents and squirrels will immediately investigate and consume your efforts. Sit back and wait for winter to pass, and by mid-April, you will see new seedlings emerging. For more information on winter sowing and a source of local native plant seed, check out my friends at Wild Seed Project in North Yarmouth, Maine.
This week Take time to enjoy your garden. Note how it makes you feel, the smells and sounds, the sunshine or raindrops on your face. There is always so much to do in the garden, but be sure to plan time to reap the benefits of your work, to slow down, and to connect with nature in our backyards and public spaces.
Ulrich Lorimer is the director of horticulture at the Native Plant Trust in Framingham. Send your gardening questions, along with your name/initials and hometown, to [email protected] for possible publication.
Get the latest news on buying, selling, renting, home design, and more.


